环境准备
安装 Git
- 访问 Git 官网:
https://git-scm.com/downloads - 下载适合您系统的安装包,一路点击"下一步"完成安装。
安装 Hugo
-
从
GitHub Releases下载压缩包重要提示:必须选择 extended 版本,例如:
hugo_extended_0.145.0_windows-amd64.zip -
解压后将
hugo.exe放入指定目录,如:D:\tools\hugo_extended\hugo.exe -
将
hugo.exe所在目录添加到系统环境变量,如:D:\tools\hugo_extended -
验证安装:打开命令提示符(CMD),输入以下命令:
1hugo version如果看到类似下面的输出,则说明安装成功:
1hugo v0.145.0-666444f0a52132f9fec9f71cf25b441cc6a4f355+extended windows/amd64 BuildDate=2025-02-26T15:41:25Z VendorInfo=gohugoio
创建 Hugo 博客
-
新建一个目录作为博客项目的存放位置,例如:
D:\hugo -
在该目录下运行以下命令创建新站点(
blog可替换为您喜欢的名称):1hugo new site blog注意:后续内容中的"根目录"均指这里创建的
blog目录
代码托管
执行
hugo命令后,会在根目录\public下生成静态网站文件,这部分需要上传至 GitHub 。
GitHub 仓库设置
-
在 GitHub 上创建新的代码仓库,由于我们将使用 Cloudflare Pages 而非 GitHub Pages 部署网站,仓库可以设为私有
-
将本地代码提交到 GitHub 仓库:
1git init
2git config --global user.name "<用户名>"
3git config --global user.email "<邮箱>"
4git remote add origin https://github.com/<用户名>/<GitHub仓库名>.git
5git add --all
6git branch -M main
7git commit -m "first commit"
8git push origin main
Cloudflare Pages 配置
创建 Cloudflare Pages 项目
-
登录
Cloudflare官网 -
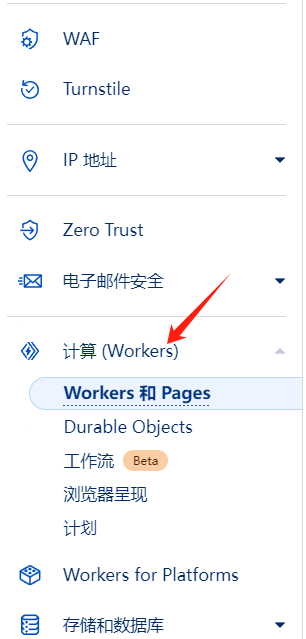
进入
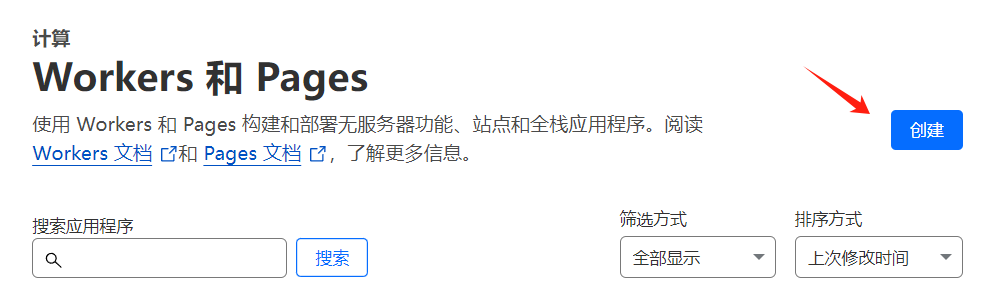
Workers和Pages页面,点击右上角的创建按钮
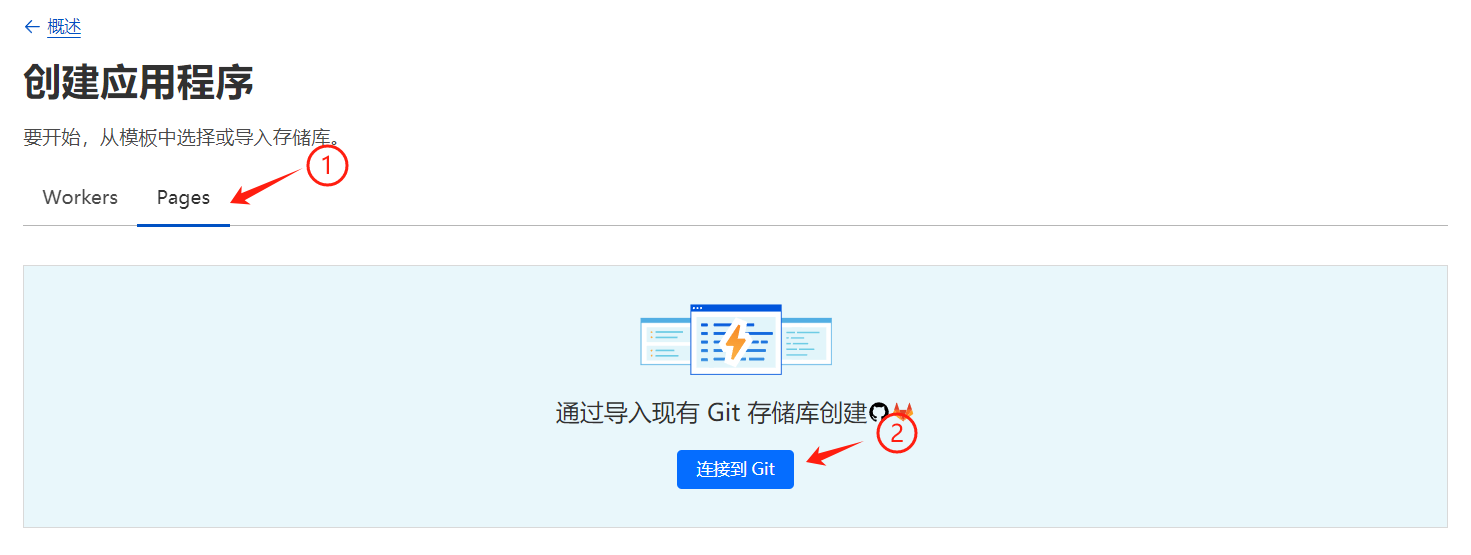
- 选择
Pages选项卡,点击连接到Git
-
选择
GitHub并授权登录您的GitHub账户,在列表中选择包含 Hugo 博客的代码仓库 -
配置构建设置:
-
生产分支:选择
main -
框架预设:选择
Hugo -
重要:添加环境变量
-
变量名:
HUGO_VERSION -
变量值:当前 Hugo 的版本号(如
0.145.0)
-

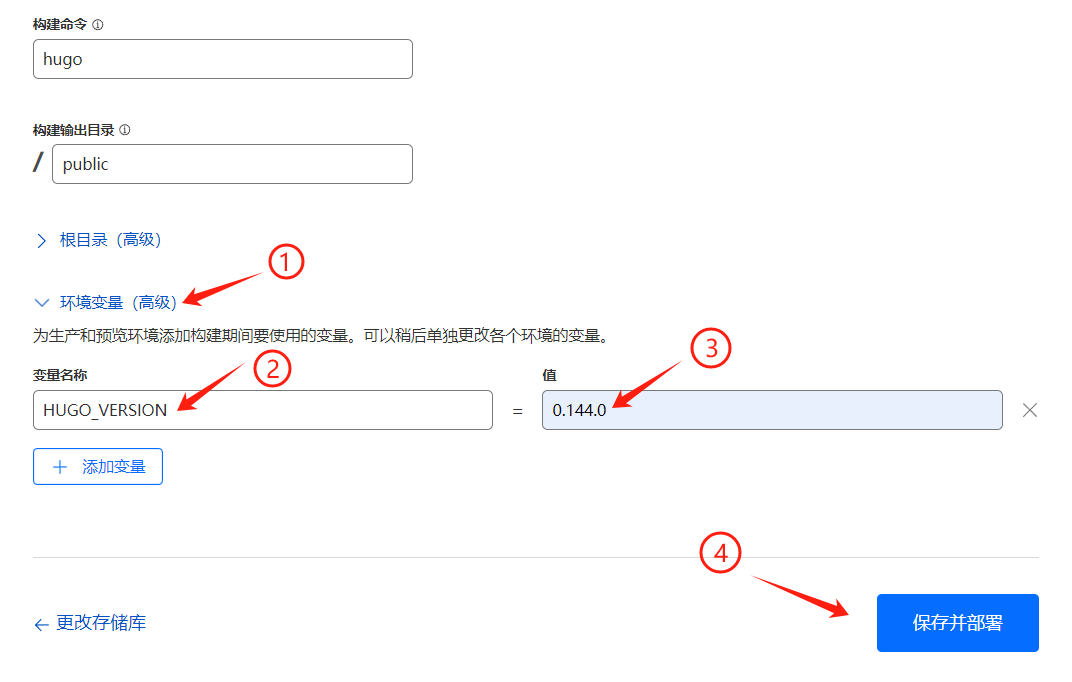
- 点击
保存并部署完成自动化部署配置
至此,您已完成基本部署设置。今后对博客的任何更新,只需提交到 GitHub 的 main 分支, Cloudflare 将自动拉取最新代码并部署。
自定义域名绑定
在 Cloudflare Pages 项目的 自定义域 选项卡中,绑定您在 Cloudflare 托管的域名,这样就可以通过自定义域名访问博客了。
主题配置与美化
安装 Stack 主题
在博客根目录下,运行以下命令安装 Stack 主题:
1git submodule add https://github.com/CaiJimmy/hugo-theme-stack.git themes/hugo-theme-stack
Git 子模块说明:
- 克隆主题:将
hugo-theme-stack从 GitHub 克隆到本地themes/hugo-theme-stack目录。 - 记录子模块信息:在主仓库中生成
.gitmodules文件,记录子模块的远程地址和本地路径。
Hugo 站点结构
Hugo 站点的标准目录结构如下:
blog/
├── archetypes/  该目录包含新内容的模板,查看详细资料
│   └── default.md
├── assets/  该目录包含通常通过资产管道传递的全局资源。这包括图像、CSS、Sass、JavaScript 和 TypeScript 等资源。查看详细资料
├── content/  该目录包含标记文件(通常是 Markdown)和构成站点内容的页面资源。查看详细资料
├── data/  该目录包含数据文件(JSON、TOML、YAML 或 XML),用于增强内容、配置、本地化和导航。查看详细资料
├── i18n/  该目录包含多语言站点的翻译表。查看详细资料
├── layouts/  layouts 目录包含用于将内容、数据和资源转换为完整网站的模板。查看详细资料
├── static/  该目录包含的文件将在您构建站点时复制到公共目录。例如:、 和验证站点所有权的文件。在引入页面捆绑包和资产管道之前,该目录还用于图像、CSS 和 JavaScript。
├── themes/  该目录包含一个或多个主题,每个主题都位于其自己的子目录中
└── hugo.toml  站点配置,可能分为多个子目录和文件。对于配置最少的项目或不需要在不同环境中表现不同的项目,在项目根目录中命名的单个配置文件就足够了。查看详细资料
主题配置设置
-
复制配置文件:
-
从
根目录\themes\hugo-theme-stack\exampleSite复制hugo.yaml到博客根目录 -
如果根目录已有其他配置文件(如
hugo.toml),请删除 -
根据需要修改
hugo.yaml中的配置参数
-
-
复制主题资源到个人站点:
1xcopy themes\hugo-theme-stack\archetypes archetypes\ /E /I
2xcopy themes\hugo-theme-stack\assets assets\ /E /I
3xcopy themes\hugo-theme-stack\data data\ /E /I
4xcopy themes\hugo-theme-stack\i18n i18n\ /E /I
5xcopy themes\hugo-theme-stack\layouts layouts\ /E /I
6xcopy themes\hugo-theme-stack\exampleSite\content content\ /E /I
设置网站图标和头像
-
网站图标:将
favicon.ico放到根目录\static目录下- 在配置文件中设置:
favicon: /favicon.ico
- 在配置文件中设置:
-
侧栏头像:将
avatar.png放到根目录\assets\img目录下- 在配置文件中设置:
src: img/avatar.png
- 在配置文件中设置:
添加功能页面
如果需要搜索和归档功能,从主题示例中复制相应文件:
- 将
根目录\themes\hugo-theme-stack\exampleSite\content\page中的相关.md文件 - 复制到
根目录\content\page目录下(如search和archives等)
自定义样式美化
在 根目录\assets\scss 下创建 custom.scss 文件,添加自定义样式。以下是参考样式:
  1//----------------------------------------------------
  2// 页面基本配色
  3:root {
  4    // 全局顶部边距
  5    --main-top-padding: 30px;
  6    // 全局卡片圆角
  7    --card-border-radius: 25px;
  8    // 标签云卡片圆角
  9    --tag-border-radius: 8px;
 10    // 卡片间距
 11    --section-separation: 40px;
 12    // 全局字体大小
 13    --article-font-size: 1.8rem;
 14    // 行内代码背景色
 15    --code-background-color: #f8f8f8;
 16    // 行内代码前景色
 17    --code-text-color: #e96900;
 18
 19    // 暗色模式下样式
 20    &[data-scheme="dark"] {
 21        // 行内代码背景色
 22        --code-background-color: #f8f8f814;
 23        // 行内代码前景色
 24        --code-text-color: #e96900;
 25    }
 26}
 27
 28//------------------------------------------------------
 29// 修复引用块内容窄页面显示问题
 30a {
 31    word-break: break-all;
 32}
 33
 34code {
 35    word-break: break-all;
 36}
 37
 38//---------------------------------------------------
 39// 文章封面高度
 40.article-list article .article-image img {
 41    width: 100%;
 42    height: 200px !important;
 43    object-fit: cover;
 44
 45    @include respond(md) {
 46        height: 250px !important;
 47    }
 48
 49    @include respond(xl) {
 50        height: 285px !important;
 51    }
 52}
 53
 54//--------------------------------------------------
 55// 文章内容图片圆角阴影
 56.article-page .main-article .article-content {
 57    img {
 58        max-width: 96% !important;
 59        height: auto !important;
 60        border-radius: 8px;
 61    }
 62}
 63
 64//------------------------------------------------
 65// 文章内容引用块样式
 66.article-content {
 67    blockquote {
 68        border-left: 6px solid #d57b5e !important;
 69        background: #ffefdf;
 70    }
 71}
 72
 73[data-scheme="dark"] {
 74    .article-content {
 75        blockquote {
 76            border-left: 6px solid #d57b5e !important;
 77            background: #d57c5e54;
 78        }
 79    }
 80}
 81
 82// ---------------------------------------
 83// 代码块样式修改
 84.highlight {
 85    max-width: 102% !important;
 86    background-color: var(--pre-background-color);
 87    padding: var(--card-padding);
 88    position: relative;
 89    border-radius: 20px;
 90    margin-left: -7px !important;
 91    margin-right: -12px;
 92    box-shadow: var(--shadow-l1) !important;
 93
 94    &:hover {
 95        .copyCodeButton {
 96            opacity: 1;
 97        }
 98    }
 99
100    // keep Codeblocks LTR
101    [dir="rtl"] & {
102        direction: ltr;
103    }
104
105    pre {
106        margin: initial;
107        padding: 0;
108        margin: 0;
109        width: auto;
110    }
111}
112
113//-------------------------------------------
114// light模式下的代码块样式调整
115[data-scheme="light"] .article-content .highlight {
116    background-color: #fff9f3;
117}
118
119[data-scheme="light"] .chroma {
120    color: #ff6f00;
121    background-color: #fff9f3cc;
122}
123
124//-------------------------------------------
125// 设置选中字体的区域背景颜色
126::selection {
127    color: #fff;
128    background: #34495e;
129}
130
131a {
132    text-decoration: none;
133    color: var(--accent-color);
134
135    &:hover {
136        color: var(--accent-color-darker);
137    }
138
139    &.link {
140        color: #4288b9ad;
141        font-weight: 600;
142        padding: 0 2px;
143        text-decoration: none;
144        cursor: pointer;
145
146        &:hover {
147            text-decoration: underline;
148        }
149    }
150}
151
152//-------------------------------------------------
153// 文章封面高度更改
154.article-list article .article-image img {
155    width: 100%;
156    height: 150px;
157    object-fit: cover;
158
159    @include respond(md) {
160        height: 200px;
161    }
162
163    @include respond(xl) {
164        height: 305px;
165    }
166}
167
168//---------------------------------------------------
169// 全局页面布局间距调整
170.main-container {
171    min-height: 100vh;
172    align-items: flex-start;
173    padding: 0 15px;
174    gap: var(--section-separation);
175    padding-top: var(--main-top-padding);
176
177    @include respond(md) {
178        padding: 0 37px;
179    }
180}
181
182//--------------------------------------------------
183// 页面三栏宽度调整
184.container {
185    margin-left: auto;
186    margin-right: auto;
187
188    .left-sidebar {
189        order: -3;
190        max-width: var(--left-sidebar-max-width);
191    }
192
193    .right-sidebar {
194        order: -1;
195        max-width: var(--right-sidebar-max-width);
196
197        /// Display right sidebar when min-width: lg
198        @include respond(lg) {
199            display: flex;
200        }
201    }
202
203    &.extended {
204        @include respond(md) {
205            max-width: 1024px;
206            --left-sidebar-max-width: 25%;
207            --right-sidebar-max-width: 22% !important;
208        }
209
210        @include respond(lg) {
211            max-width: 1280px;
212            --left-sidebar-max-width: 20%;
213            --right-sidebar-max-width: 30%;
214        }
215
216        @include respond(xl) {
217            max-width: 1453px; //1536px;
218            --left-sidebar-max-width: 15%;
219            --right-sidebar-max-width: 25%;
220        }
221    }
222
223    &.compact {
224        @include respond(md) {
225            --left-sidebar-max-width: 25%;
226            max-width: 768px;
227        }
228
229        @include respond(lg) {
230            max-width: 1024px;
231            --left-sidebar-max-width: 20%;
232        }
233
234        @include respond(xl) {
235            max-width: 1280px;
236        }
237    }
238}
239
240//-------------------------------------------------------
241// 全局页面小图片样式微调
242.article-list--compact article .article-image img {
243    width: var(--image-size);
244    height: var(--image-size);
245    object-fit: cover;
246    border-radius: 17%;
247}
248
249//----------------------------------------------------
250// 固定代码块的高度
251.article-content {
252    .highlight {
253        padding: var(--card-padding);
254        pre {
255            width: auto;
256            max-height: 20em;
257        }
258    }
259}
260
261//--------------------------------------------------
262// 修改首页搜索框样式
263.search-form.widget input {
264    font-size: 1.5rem;
265    padding: 44px 25px 19px;
266}
267
268//--------------------------------------------------
269// 归档页面双栏
270@media (min-width: 1024px) {
271    .article-list--compact {
272        display: grid;
273        grid-template-columns: 1fr 1fr;
274        background: none;
275        box-shadow: none;
276        gap: 1rem;
277
278        article {
279            background: var(--card-background);
280            border: none;
281            box-shadow: var(--shadow-l2);
282            margin-bottom: 8px;
283            border-radius: 16px;
284        }
285    }
286}
博客内容创作
详细的写作指南可参考另一篇博客:《Hugo博客写作指南》
创建文章结构
博客内容在 content/post 目录下组织,推荐的结构如下:
1content
2└── post
3    └── my-first-post
4        ├── index.md
5        └── (相关图片等资源)
不太推荐使用本地图片,可以根据[使用Cloudflare R2 + PicGo搭建免费图床]中的教程自己搭建免费图床。
本地预览
编辑过程中随时可以启动本地预览服务器,在博客根目录下运行:
1hugo server -D
访问 http://localhost:1313/ 即可预览效果。
更新维护
更新 Hugo
需要更新 Hugo 版本时,从GitHub Releases下载最新版本,替换原有文件即可。
更新主题
在 根目录\themes\hugo-theme-stack\ 目录下运行以下命令拉取最新主题:
1git pull
常见问题解决
样式更新不生效
如果修改 CSS 样式或更新主题后,变化没有立即生效:
- 删除
根目录\resources\_gen下所有文件 - 重新运行
hugo server或构建命令
内容显示异常
如果文章内容显示不正确:
- 删除
根目录\public下所有文件(保留.git文件夹) - 重新构建站点